
Have you just created a Payoneer account but don’t know where to start? Do you want to send payment requests to international customers, transfer money to partners within the Payoneer system, or withdraw funds to your Vietnamese bank account, but aren’t sure how to do it? Don’t worry! By mastering Payoneer’s four core features, you’ll be able to manage and use your account effectively. In this article, CongtySetup will walk you through each step—from sending and receiving payments to withdrawing funds to your bank account—along with important tips to ensure your transactions are fast, secure, and free from common mistakes.
Request a Payment
At its core, “Request a Payment” is a feature that allows you to proactively send an electronic invoice or payment request directly from your Payoneer account to the email addresses of your customers (business partners or individuals) worldwide. Instead of having to go through the complicated process of an international wire transfer at a bank, your customers simply need to click on the link they receive and pay immediately using a variety of flexible payment methods, such as Visa or Mastercard credit cards, debit cards, or domestic bank transfers.
The following is the process for sending payment requests to customers:
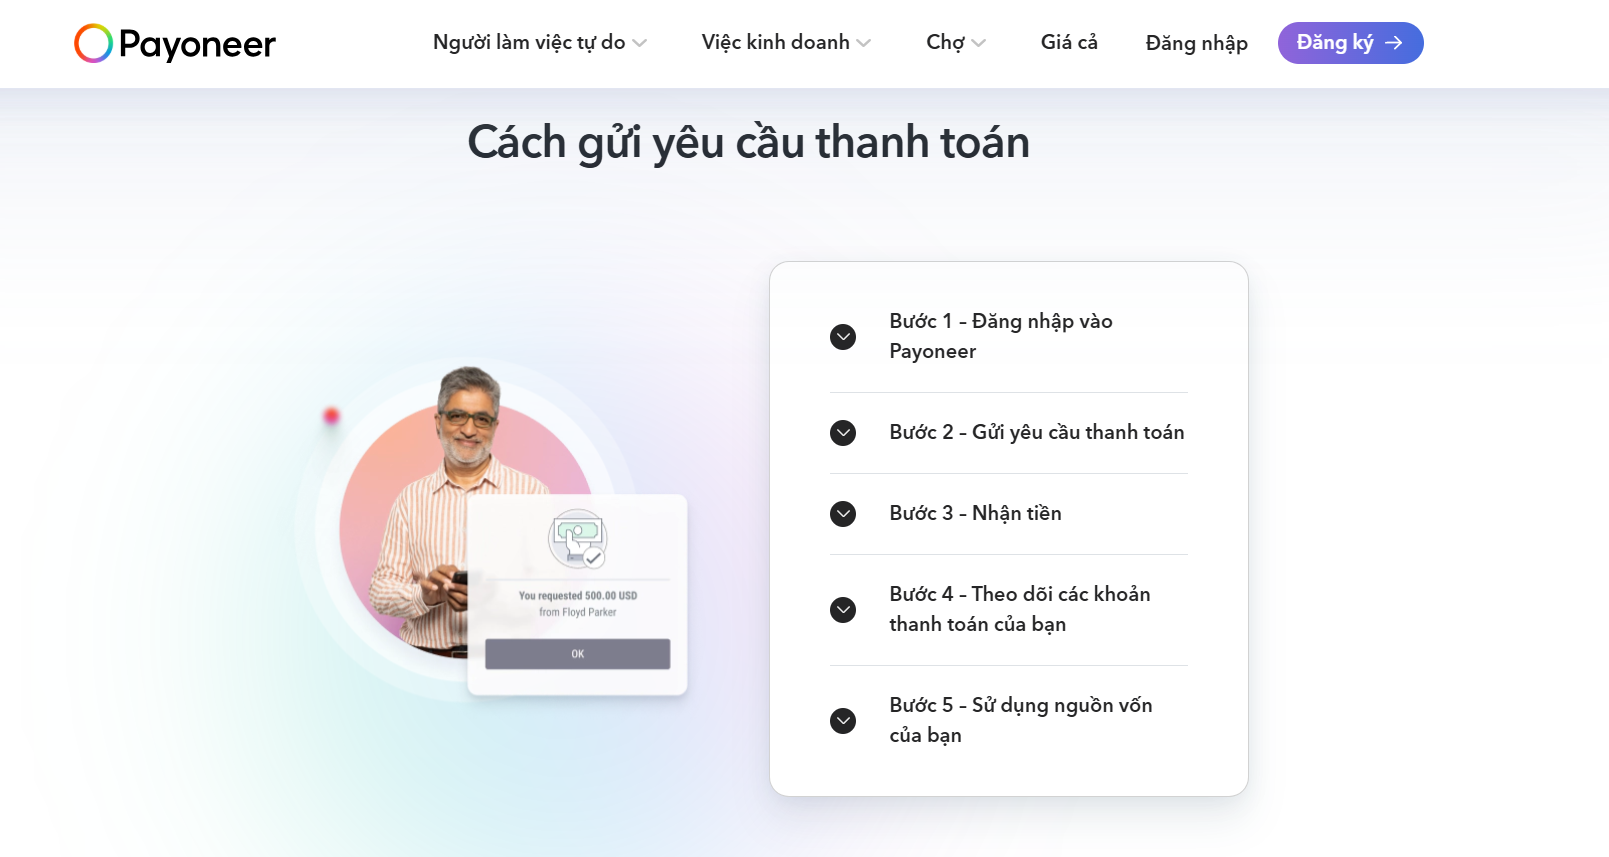
Step 1: Log in to your Payoneer account
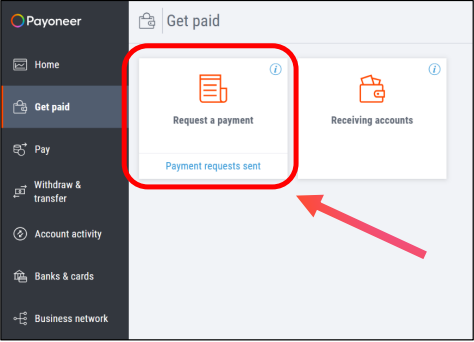
Select "Get Paid," then click "Request a Payment."
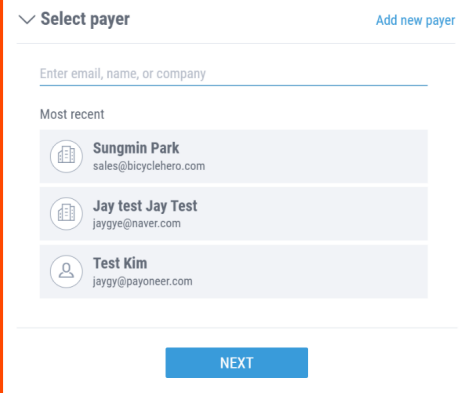
Step 2: Select the payer
- Enter the payer's email address, name, or company name in the "Enter email, name, or company" field.
- If the payer has done business with you before, you can select them from the "Most Recent" list.
- If you want to add a new payer, click "Add New Payer."
Next, proceed to the "Payment Details" section.
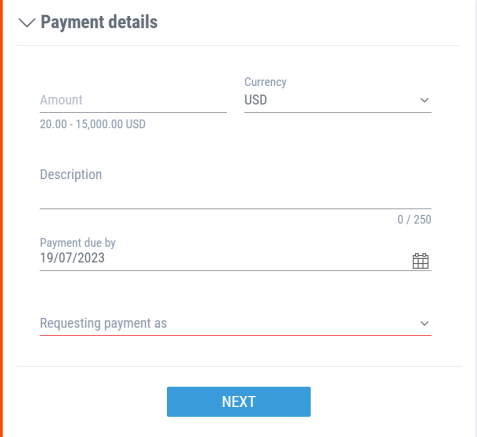
Step 3: Enter your payment information
Please fill in all the information regarding the payment you wish to request.
Once you're done, click NEXT to proceed to the "Attach Documents" section.
Step 4: Attach documents
- Drag and drop a file or select a file from your computer to upload it.
- You can attach documents such as invoices, service contracts, employment contracts, and other relevant documents.
- The system allows you to upload up to 5 documents.
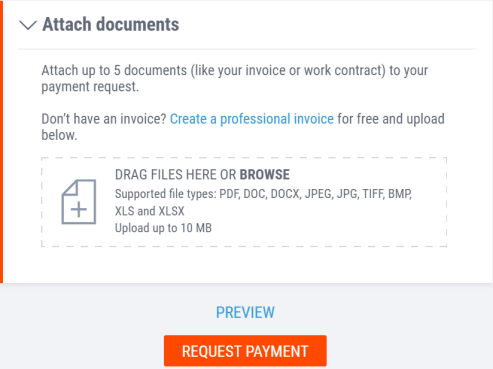
Note: If you don't have an invoice yet, click "Create a Professional Invoice" to use Payoneer's online invoice generator.
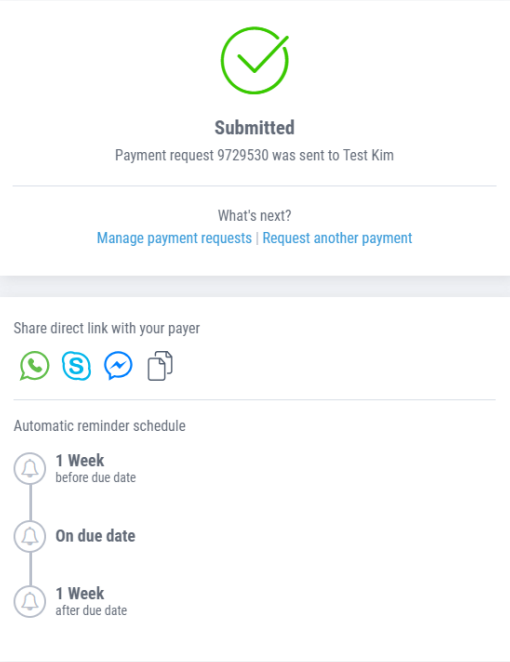
Step 5: Finish
After submitting a payment request:
- The system will display a confirmation screen indicating that the request was successfully submitted.
- The payer will receive an email containing a payment request from Payoneer.
After submitting a payment request, your customers will need to complete the Payoneer payment request. Below is a specific 4-step process to help your customers complete it quickly:
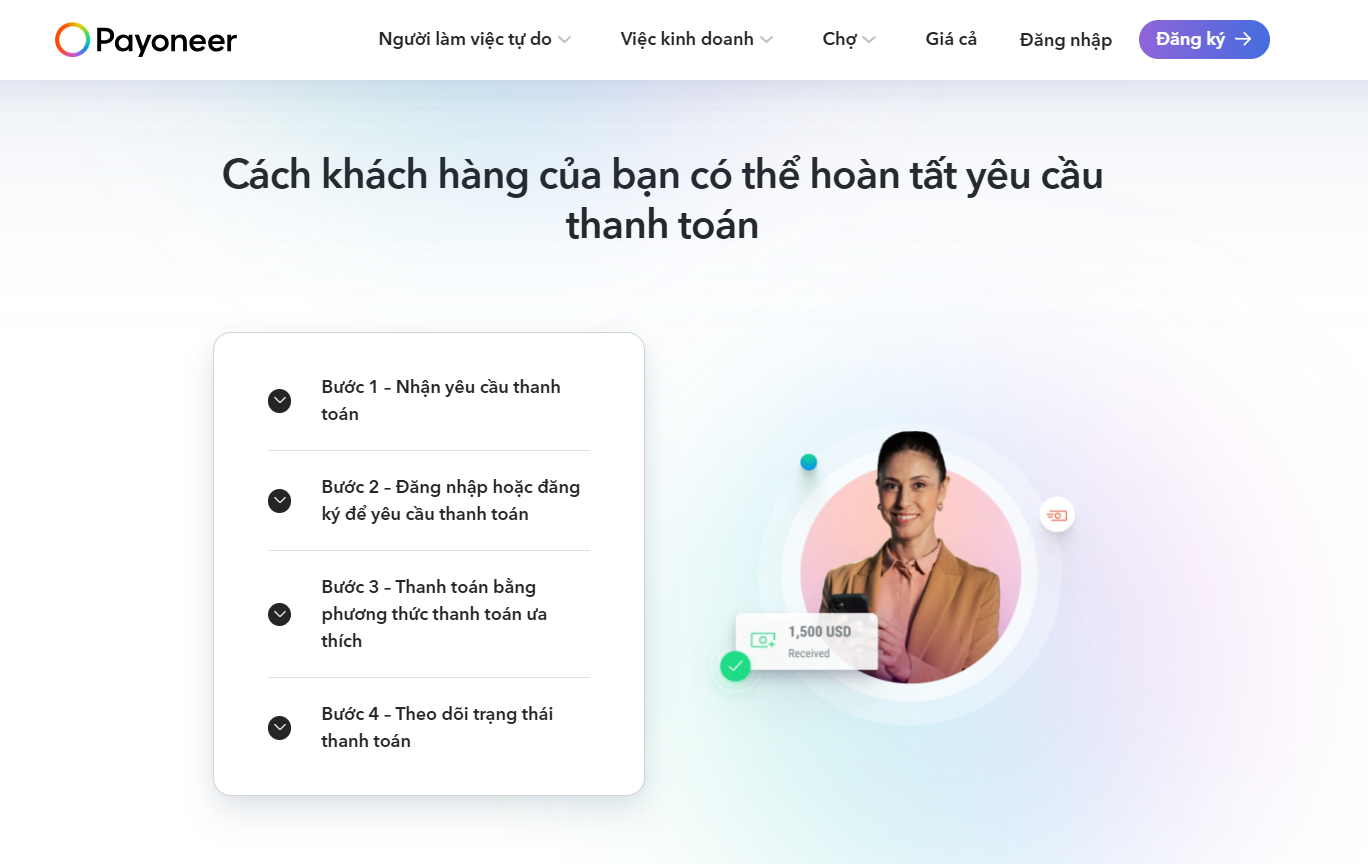
Step 1: Receive a payment request
As soon as you send a payment request from your Payoneer account, the system will automatically send a notification email to the customer’s inbox. This email will contain full details about the amount due, the work or product description, and a secure direct payment link. The customer simply needs to open the email and click the button or link provided.
Step 2: Log in or sign up to request payment
After clicking the link, customers will be redirected to Payoneer’s secure checkout page. There:
- If customers already have a Payoneer account, they just need to log in to continue.
- If a customer does not yet have an account, the system will guide them through the registration process or help them quickly enter the necessary basic information to verify their identity and complete the payment.
Step 3: Pay using your preferred payment method
Customers can choose the payment method that works best for them. Payoneer supports a variety of flexible payment methods, including:
- Credit or debit card (Visa, Mastercard, Amex, etc.).
- Domestic bank account transfers (such as ACH in the U.S., SEPA in Europe, etc.).
- Pay directly using your Payoneer account balance (if available).
- After selecting a payment method, customers should double-check the amount, enter their payment information, and confirm the payment.
Step 4: Track the payment status
Once the money transfer is complete, both you and the customer will receive an email confirming that the transaction is being processed. The customer can track this status to know exactly when the funds have been successfully transferred and deducted from their account, ensuring complete transparency for both parties.
Some Frequently Asked Questions
To check the status of a payment request you have submitted:
- Log in to Payoneer.
- Click the "Receive" tab and select "Request Payment."
- On the "Sent Payment Requests" page, select a payment request to view its details.
- In the Timeline tab, you can view the status of your payment request.
If your payment is on hold, please try the following steps:
- Check the Verification Center in your Payoneer account, located in the Settings menu, to see if any information or documents are required for payment approval.
- Please check your inbox for an email from Payoneer. We may have asked you to provide some information to approve the payment.
- Please contact the payer and ask them to check their email, as in some cases we need information from the payer to approve the payment.
If you have provided the requested information through the Verification Center or via email, this means the payment is currently being reviewed; this process typically takes up to 4 business days. You will receive an email when your customer makes the payment and when the payment has been transferred to your account.
You can find more information about payment requests here.
Here are some common reasons why Payoneer might decline a payment:
- The payer's bank or credit card issuer has declined the transaction.
- The request for additional documentation to approve the payment has not been fulfilled.
- This payment transaction does not comply with our Terms and Conditions. Please click here to view the list of prohibited transactions.
We recommend that you check your email inbox to see if we’ve sent you any additional information regarding your payment. You can also refer to the FAQ section "Why was my payment declined? " for more information.
If you were previously able to request a payment but no longer have that option, please contact us . Features that aren’t in use are sometimes disabled as a security measure, but we can usually reactivate them quickly.
Please note that we may first ask you to provide some additional documentation about yourself and/or your business to ensure the security of your account.
In some cases, we may be unable to reactivate a particular feature due to security issues or terms of service.
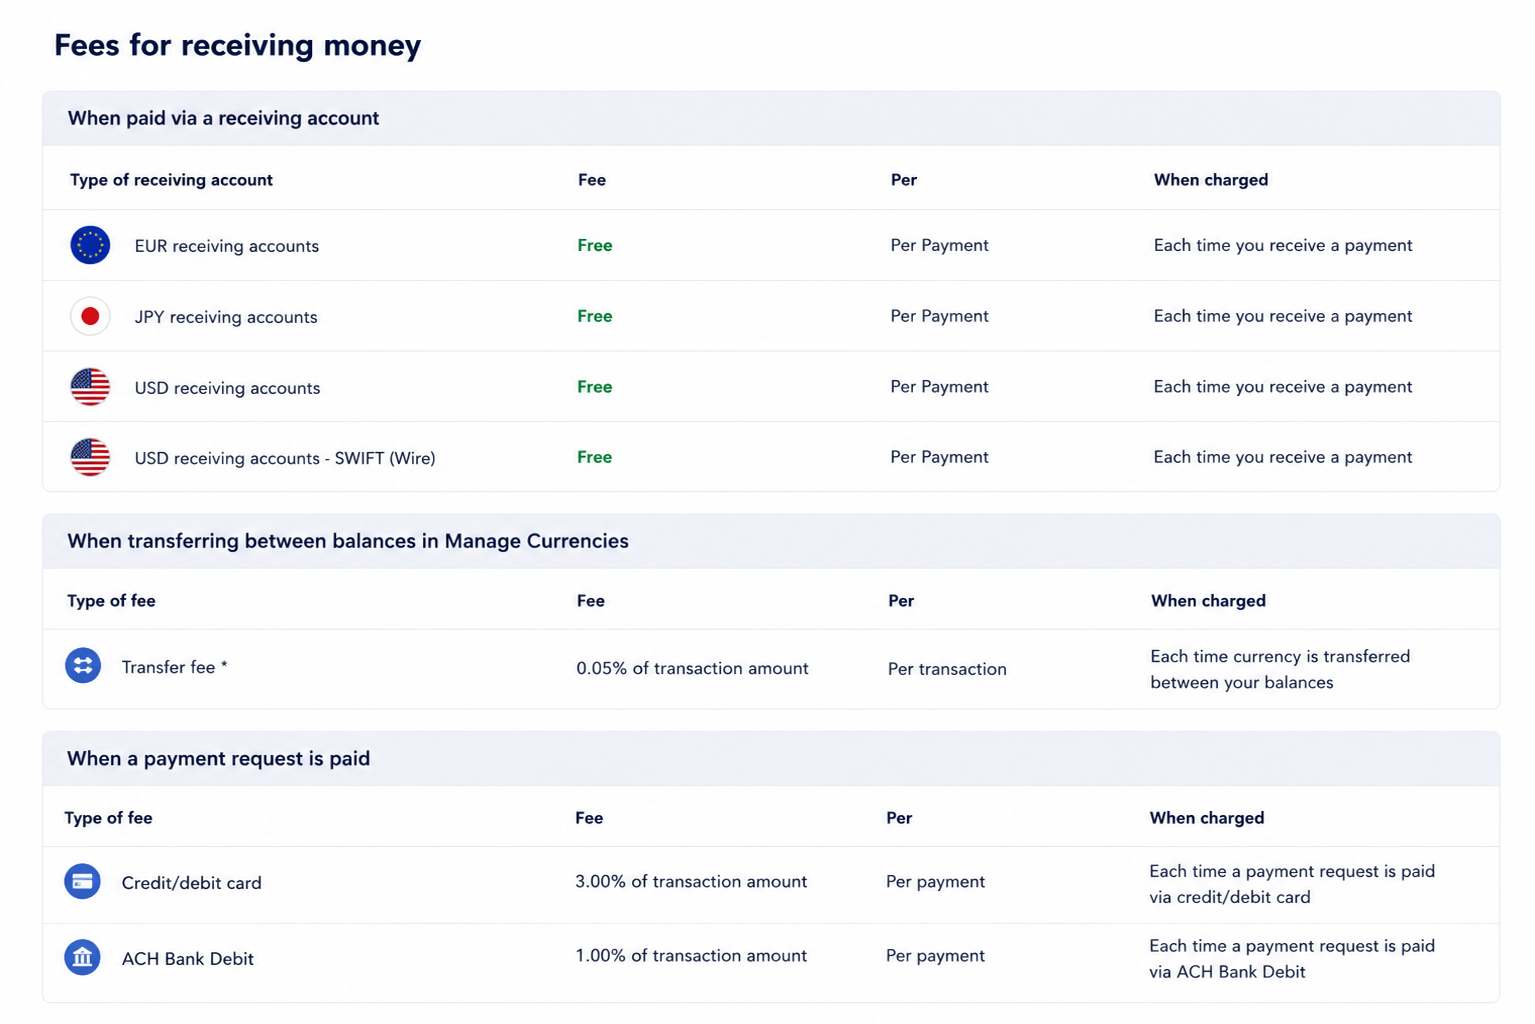
The fee for receiving payments through the Payment Request service depends on the payment method used to complete the transaction:
Credit cards: Fees of up to 3.99% of the transaction amount. In some countries, a fixed fee of $0.49 will be added to this amount.
ACH Debit: The fee is 1% of the payment amount.
Local bank transfer:
- A maximum fee of 1% applies to payments received in a USD-denominated account.
- No fees are charged for payments received into the account in other currencies.
Payoneer account balance: No fees.
If you receive a payment amount that is less than expected, please check to see if the difference is due to the fee mentioned above.
You can find more information about the Payment Request service here
Payment requests are subject to eligibility requirements. Below is a list of some issues that may cause errors when attempting to submit a payment request:
- Country not found - Payment requests can be sent to payers in most countries. Countries that do not support payment requests will not appear in the list.
- Domestic Payments - In some countries, using this service to receive payments from payers within the same country is not permitted. If this restriction applies in your country, you will receive an error message stating that the service does not support domestic payments.
- Payment Request Limit - You can send up to 100 payment requests per day.
- Unsupported characters - The payment request form supports only Latin characters. You may encounter an error when entering special characters.
You can find more information about the Payment Request service here
- Some Important Notes on Using Payoneer
Always try to prioritize using the “Request Payment” feature and never transfer personal funds into your account, as Payoneer only accepts business payments. Additionally, avoid using Payoneer as a bank to hold funds; it’s best to regularly withdraw funds to your local bank account to prevent the risk of your account being suddenly locked. Finally, always have your business documents (invoices, contracts, website, etc.) ready and respond promptly when asked to verify your information to ensure your account continues to operate smoothly.
How to Make Payments to Other Payoneer Users
It is important to understand that “Pay to a Recipient’s Payoneer Account” is not designed to collect payments from customers, but rather to transfer funds between Payoneer accounts. This feature was introduced to meet the needs of businesses and individuals who frequently work with international partners, particularly in the context of the growing digital economy and the rise of remote work.
Imagine a business in Vietnam that provides website design services to clients in many countries. After completing a project, the business uses the “Request a Payment” feature to send a payment request to the client. Once the client successfully makes the payment, the amount is credited to the business’s Payoneer account.
At this point, businesses have several options for using that money. In addition to withdrawing it to a bank account, businesses can also use their Payoneer balance immediately to pay other partners.
For example, a business needs to pay a programmer in India, a graphic designer in the Philippines, or a marketing agency in Australia. If these partners all have Payoneer accounts, the business can simply use the “Pay to a Recipient’s Payoneer Account” feature to transfer funds directly from its own Payoneer account to the partner’s Payoneer account.
Step-by-Step Process
Step 1: Log in to your Payoneer account
Select Pay → Pay to a recipient’s Payoneer account.
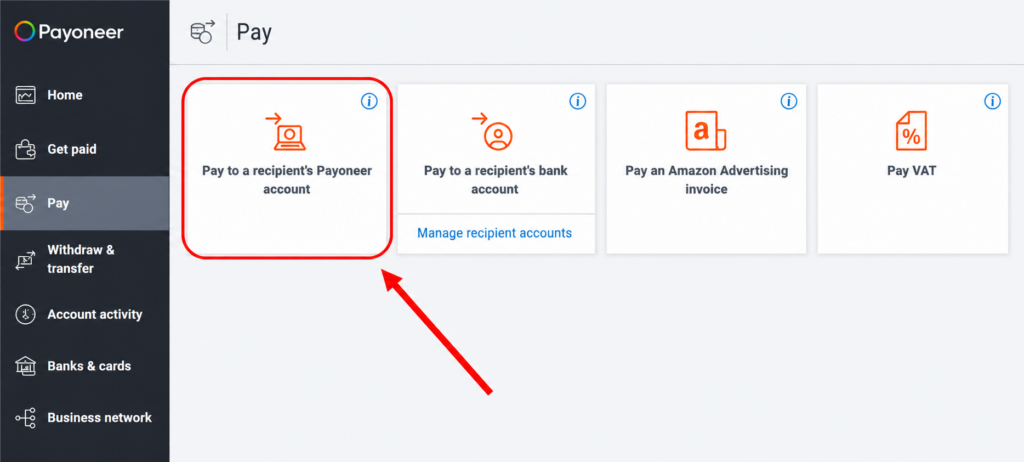
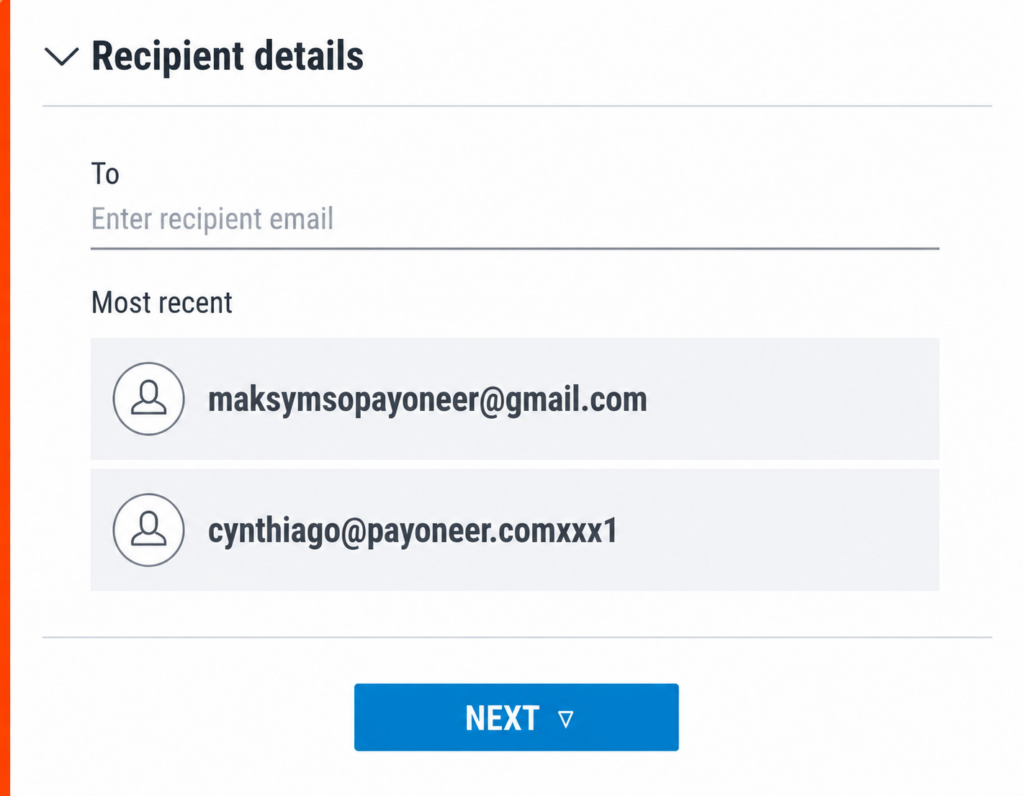
Step 2: Enter the recipient's information
- Enter the recipient's name or email address in the "Enter recipient email" field.
- If the recipient has been paid before, you can select them from the "Most Recent" list.
- Then click NEXT to proceed to the Payment details section.
Step 3: Enter your payment information
Please fill in the following information completely in the "Payment details" section:
a. Select the payment amount
- From the "From" menu, select the balance you want to use for payment.
- Your available balance will be displayed right below this menu.
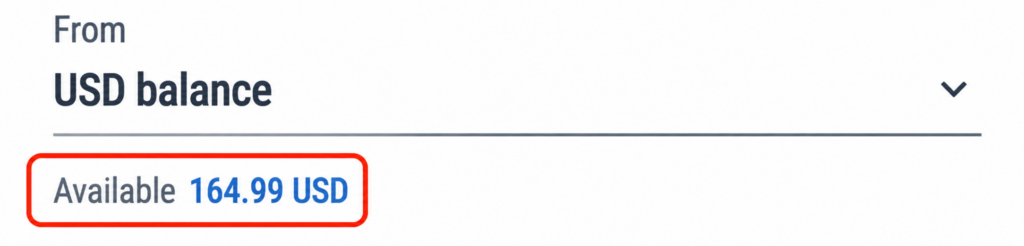
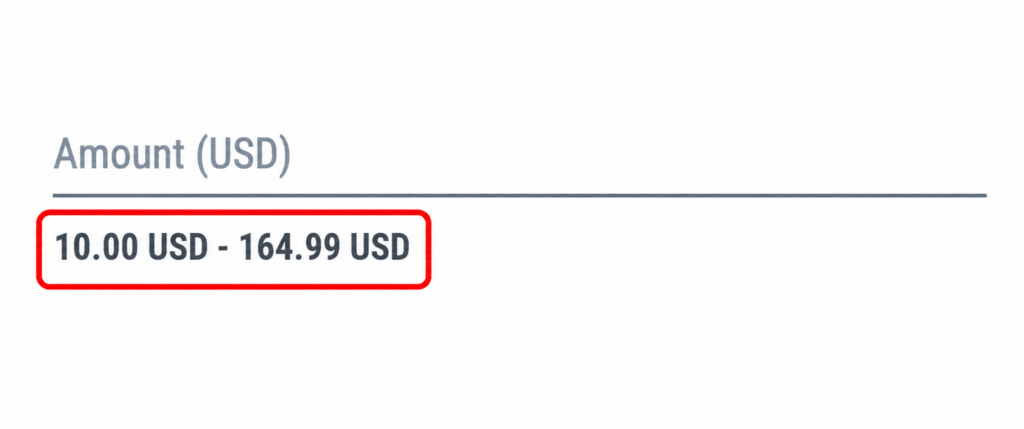
b. Enter the amount
- Enter the amount you want to pay.
- The minimum and maximum payment amounts will be displayed below the "Amount" field.
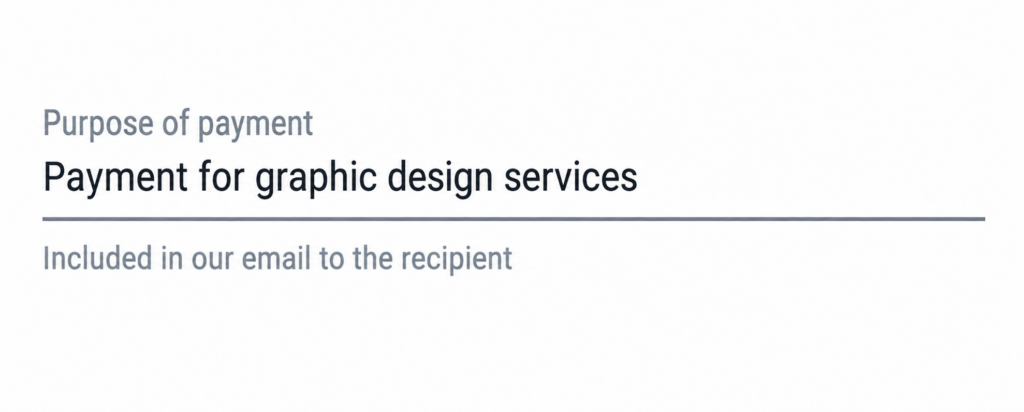
c. Enter payment details
- In the "Purpose of payment" field, enter a brief description of the purpose of the payment.
- This content will appear in the email that Payoneer sends to the recipient.
Once you're done, click REVIEW to continue.
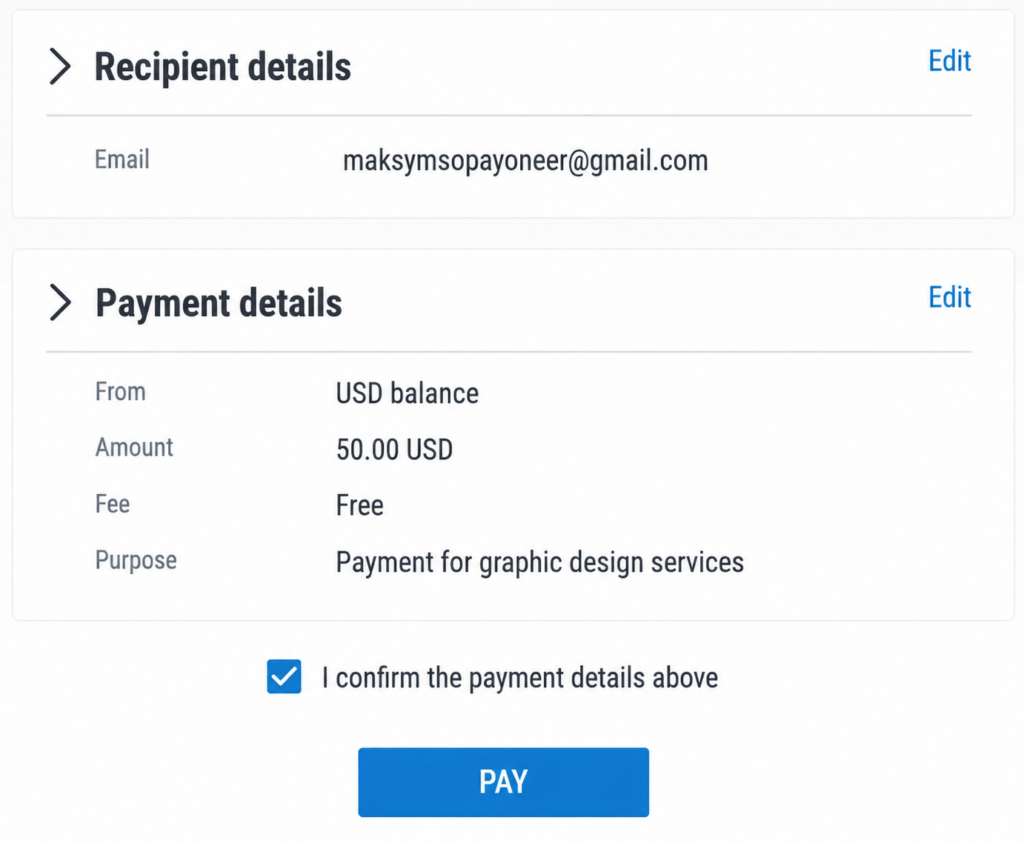
Step 4: Confirm Payment
Double-check the recipient's information and payment details to ensure everything is correct.
- If you need to make changes, click "Edit" in the corresponding section.
- If all the information is correct:
- Check the box next to "I confirm the payment details above" (I confirm that the payment information above is correct).
- Tap PAY to complete the transaction.
- The email address must be associated with the registered account
- Note
This feature only works if both the sender and the recipient have Payoneer accounts. The email address you enter during the transfer must be the one registered with Payoneer. The system will use this email address to identify the recipient’s account. If the email address is not linked to any Payoneer account, you will not be able to complete the transaction.
This is also a key difference between “Pay to a Recipient’s Payoneer Account” and “Request a Payment.” With “Request a Payment,” the recipient is not required to have a Payoneer account, as they can simply make the payment via the link provided by Payoneer using any of the supported payment methods. In contrast, “Pay to a Recipient’s Payoneer Account” is an internal money transfer within the Payoneer system, so both parties must have a Payoneer account. Below is a comparison table of the two types of transfers:
Instructions for Withdrawing Funds from Your Payoneer Account to Your Bank Account
After receiving payments from international customers, the most efficient and secure way to utilize those funds is to transfer them directly to a domestic bank account. Thanks to Payoneer’s extensive network spanning more than 150 countries and territories, this process is extremely fast, with low fees and competitive exchange rates.
To withdraw money to your local bank smoothly and avoid any issues, simply follow these simple steps:
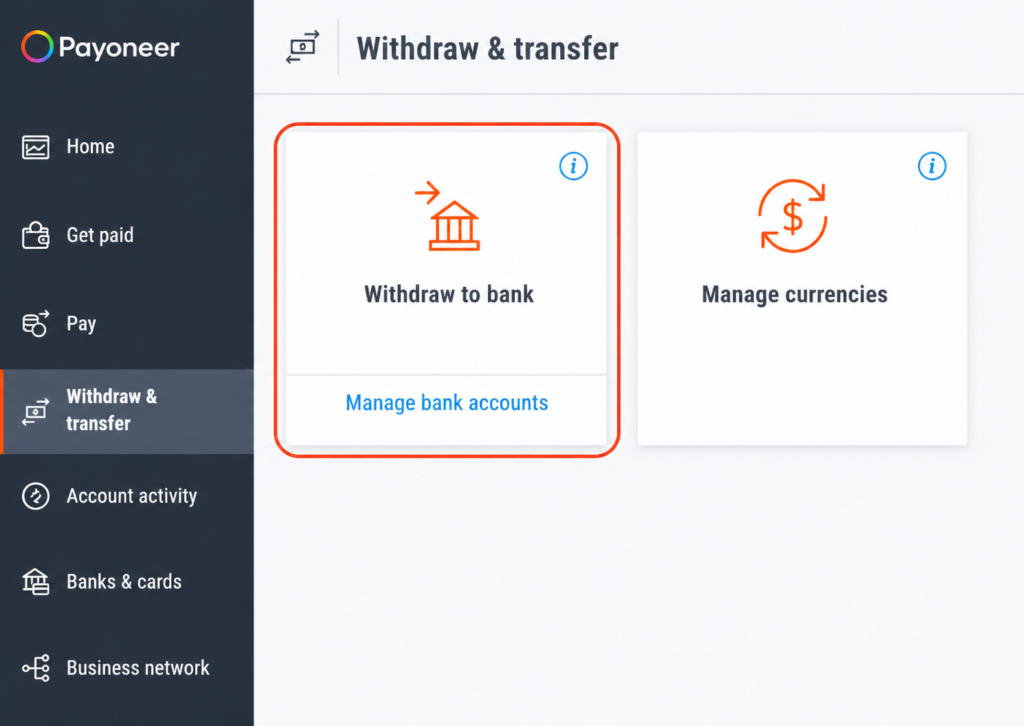
Step 1: Log in to your Payoneer account
Select "Withdraw & Transfer," then click "Withdraw to Bank"
Step 2: Enter your withdrawal information
On the Withdrawal Details screen, enter the following information:
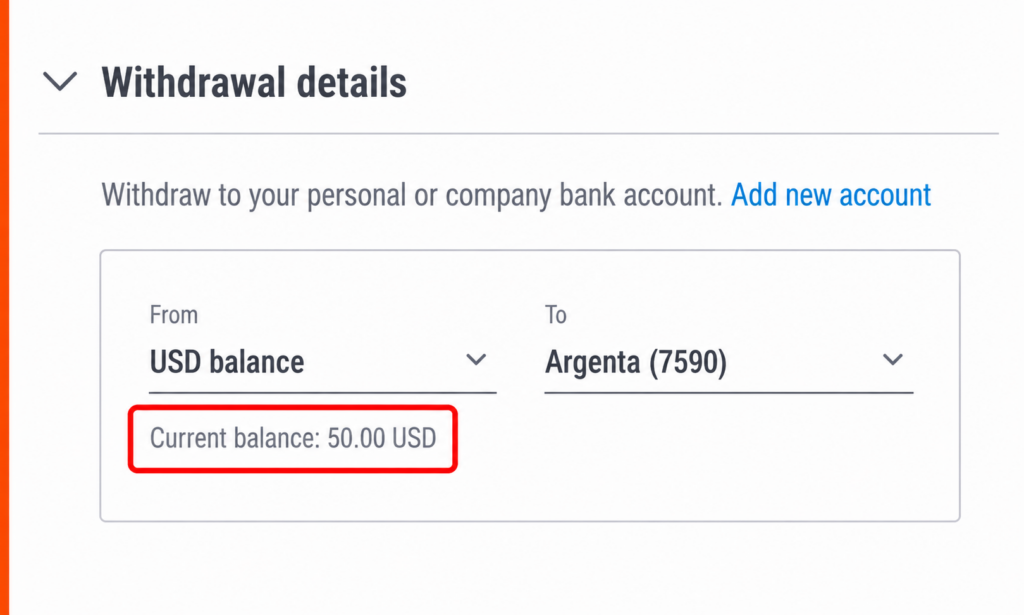
a. Select the funding source and recipient account
- In the "From" field, select the balance you want to withdraw.
- In the "To" field, select the bank account you want to transfer money to.
- The available balance will be displayed below the "From" field.
b. Enter the amount you wish to withdraw
- In the "Amount to Withdraw" field, enter the amount you want to withdraw.
- The "Amount to Deposit" field will display the actual amount your bank account will receive in your local currency, based on:
- Current exchange rate.
- Payoneer's foreign exchange conversion fees.
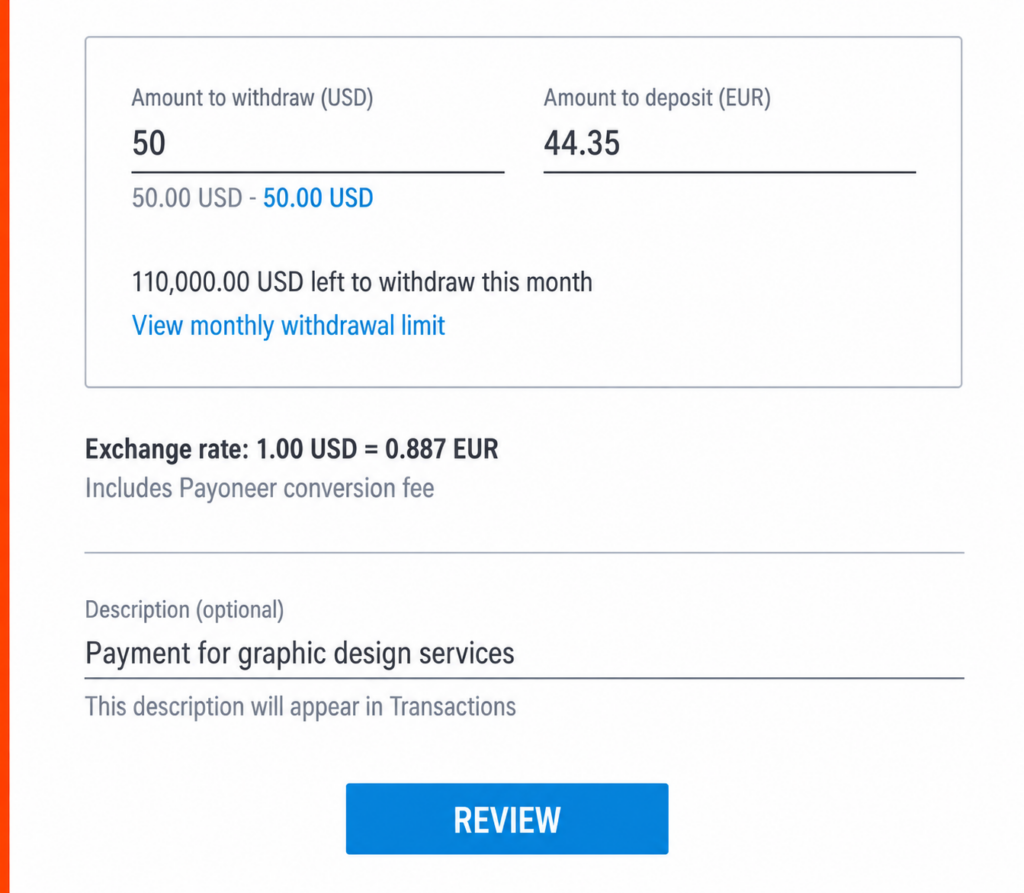
Recommendation: You should enter a brief, clear description in the "Description (Optional)" field to make it easier to track the transaction later.
Once you're done, click REVIEW to continue
Step 3: Confirm the transaction
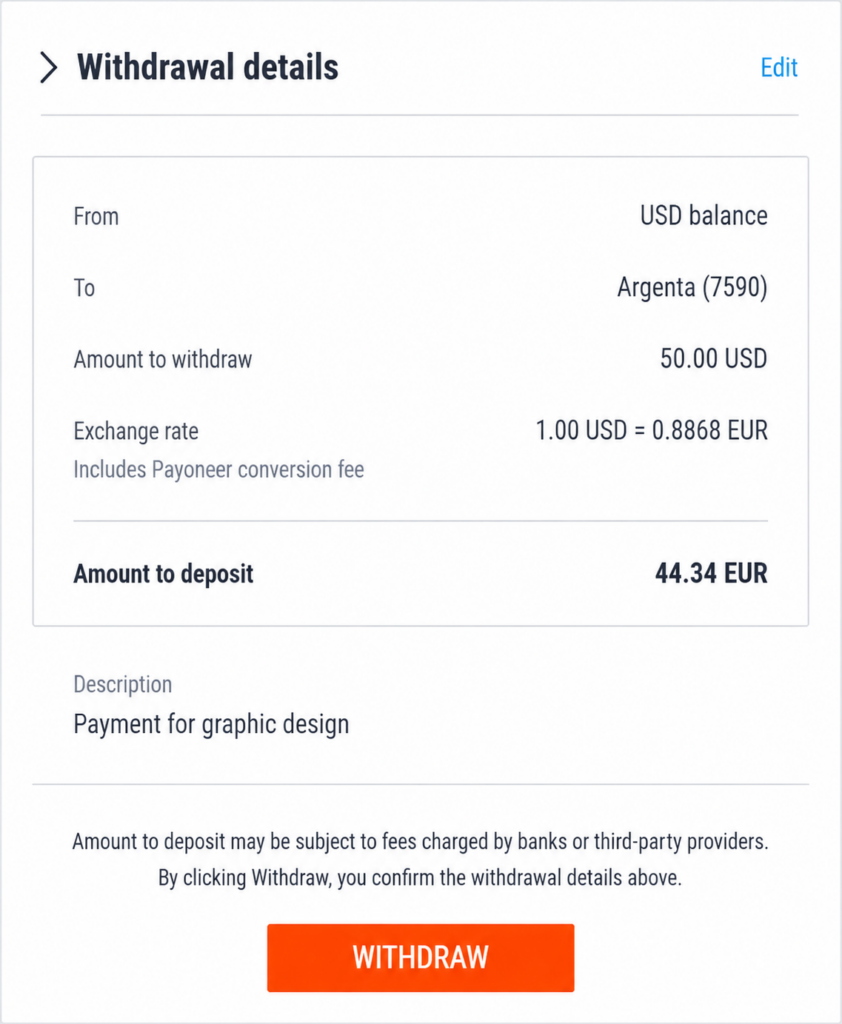
- Please double-check all withdrawal information.
- If you need to make changes, click "Edit" in the corresponding section.
- Once you have confirmed that all the information is correct, click WITHDRAW to process the transaction.
Step 4: Finish
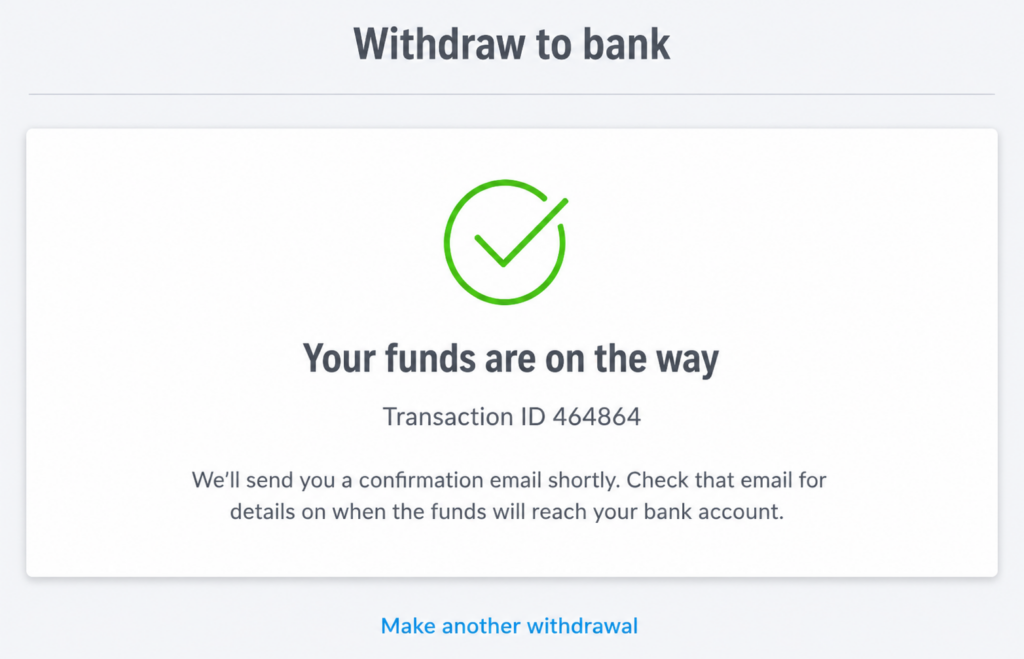
After the transaction is successfully submitted, the system will display a confirmation message stating that:
- Your withdrawal request has been successfully processed.
- The funds are currently being transferred to your bank account.
Payoneer Service Fees
Some Payoneer services may be subject to fees. You can easily view complete information about the fees that may apply to the services you are using.
To view information about fees, follow these steps:
Step 1: Log in to your Payoneer account
On the left-hand menu bar, scroll down to the bottom and select "Fees."
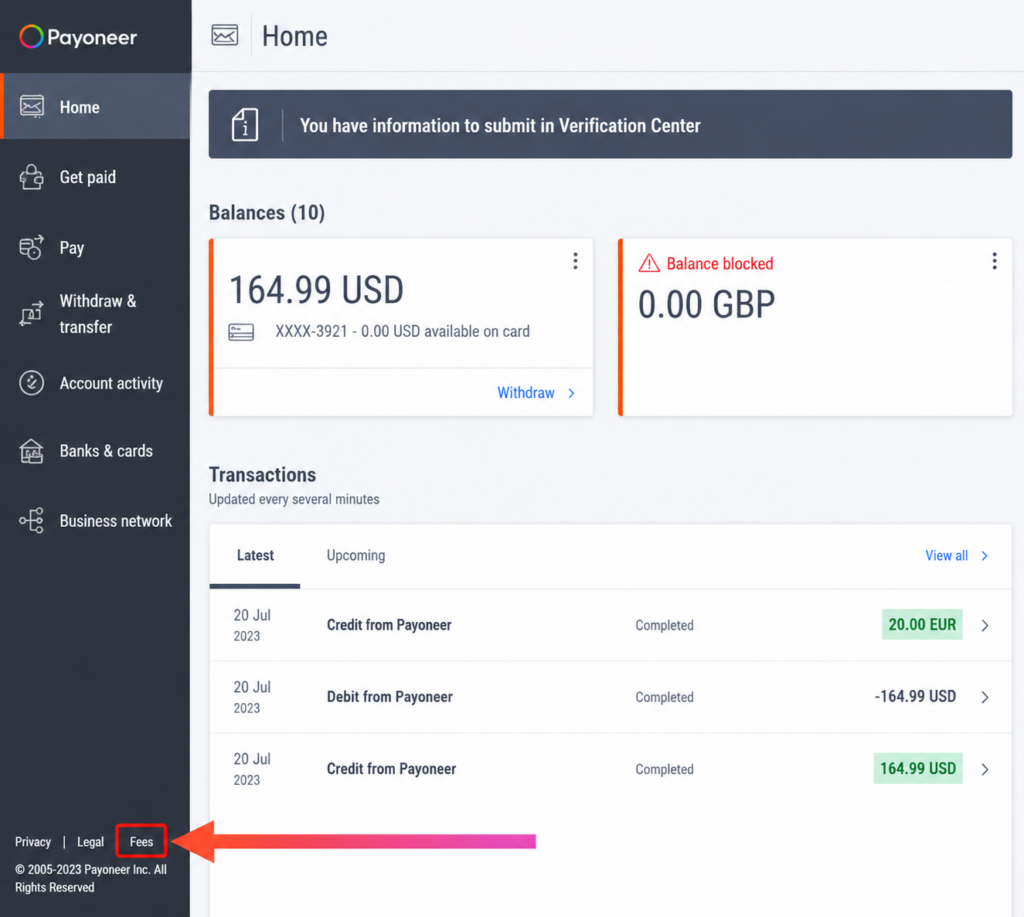
Information displayed in the "Fees" section
Here, Payoneer will display a detailed breakdown of the fees that may apply to each service you use.
The main fee categories include:
- Fees for Receiving Money (Fees for Receiving Money)
- Payment Fees (Fees for Making Payments)
- Withdrawal Fees (Fees for Withdrawing Money)
- Payoneer Card Usage Fees (Fees for Using a Payoneer Card)
- Other Fees (Other Fees)
- Note
- Scroll down the table to find the correct fee category and the information you need.
- The interface shown in this document is for illustrative purposes only.
- The information displayed in your Payoneer account may vary depending on the services you are using.